Develop a CRUD Application using Django and React (Part 3) - Frontend
In previous articles we learned to develop the backend of a simple student management web application using Django REST framework and introduced React Core concepts.
In this article you will write code to develop the frontend of student management app.
You can get the source code from my GitHub repo:
A simple student management web application with CRUD operations developed in Django and React Js - GitHub …github.com

Table of Contents
- Prerequisites
- Create React App
- Create TOP Navigation Bar
- Create Side Navigation Bar
- Create Home Page
- Create Students List Page
- Create Manage Students Page
- Test CRUD operations
- Summary
Prerequisites
Make sure you have a recent version of Node.js installed.
After installation check if node and npm are installed in your system. Run below commands to check node and npm versions in command prompt:
Check node version
node --versionCheck npm version
npm -versionCreate React App
Open Pycharm project where you created the backend of this app. If you do not want to go through backend part of this app. Then you can clone the backend repository from Github and install python and django to run the backend.
1. Inside your project directory run this command to create react app:
npx create-react-app frontendThis will take some time to create the app. Your directory structure should look like this once app is created: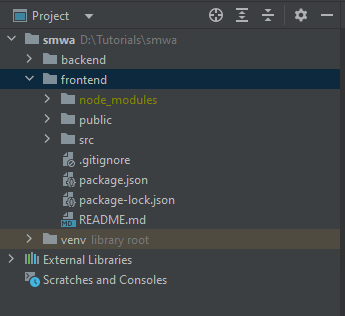
2. Navigate to frontend directory:
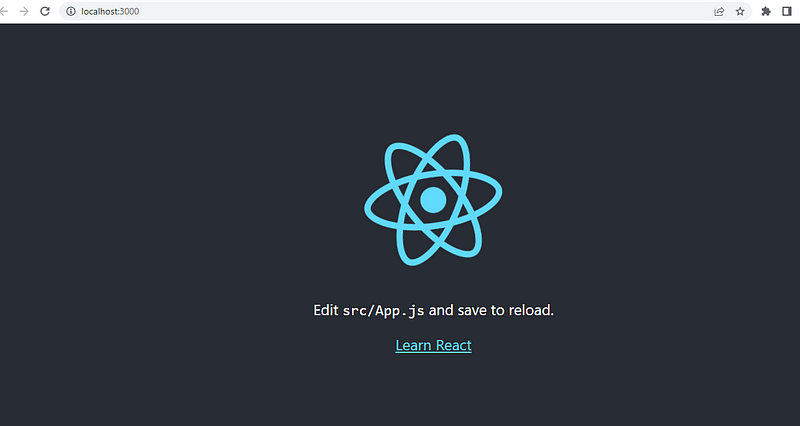
cd frontend3. Run npm start to start the react app:
npm startThis will start the app in your browser http://localhost:3000/
4. We do not need the starter code generated by React. Delete all the files inside src/ folder except index.js and reportWebVitals.jsfiles.
Note:
Don’t delete the entire src folder, just the original source files inside it. We’ll replace the default source files with examples for this project in the next step.5. Add a file named index.css in the src/ folder with this CSS code:
body {
  font: 14px "Century Gothic", Futura, sans-serif;
  margin: 0;
}
6. Take a look at the index.js file code
import App from './App';
import reportWebVitals from './reportWebVitals';

const root = ReactDOM.createRoot(document.getElementById('root'));
root.render(
  <React.StrictMode>
    <App />
  </React.StrictMode>
);

// If you want to start measuring performance in your app, pass a function
// to log results (for example: reportWebVitals(console.log))
// or send to an analytics endpoint. Learn more: https://bit.ly/CRA-vitals
reportWebVitals();
This index.js file is the starting point of the app. ReactDOM.createRoot() function will create the root element for the react app. root.render() will render the content on web page. <App />is our main React component which we will define in App.js file.
7. Add a file named App.js in the src/ folder with this JSX code:
import React from 'react';

function App() {
  return (
    <h1> Student Management System App </h1>
  );
}

export default App;
Now if you will run npm start again you should see a simple heading.
npm start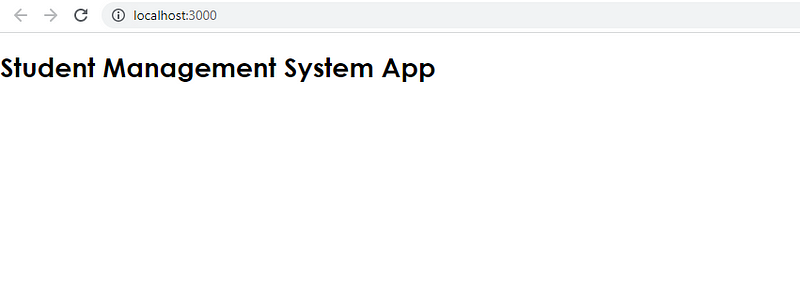
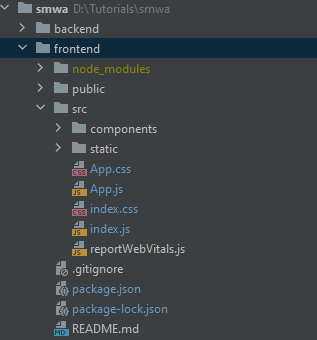
Next step is to create React components for Home, Navigation Bar, Students list and Manage Students page.
Create a new directory named components inside src/ folder. Your directory structure should look like this.
Create TOP Navigation Bar
Now we will start writing the code for top Navigation bar which will remain static for all pages.
frontend folder:npm install bootstrap
npm install react-bootstrapThis will add bootstrap and react-bootstrap dependencies inside package.json file.
2. Next we will add some styling to set the width and height of the page at 100% and also add some padding for our logo.
Add a file named App.css in the src/ folder with this code:
body, html {
  height: 100%;
  width: 100%;
  margin: 0;
}

.app-logo {
   padding-left: 50px;
}
3. We will put all the images and logo files inside static folder. Create a folder named static in the src/ folder and add logo.pngfile in this folder.
4. Add a file named Navigation.css in the src/components/ folder with this code:
import React from 'react';
import {Navbar,Nav} from 'react-bootstrap';
import logo from '../static/logo.png'
import "../App.css";


const Navigation = () => {
  return (
    <div>
    <Navbar bg="dark" variant="dark" expand="lg" id="my-nav">
        <Navbar.Brand className="app-logo" href="/">
            <img
              src={logo}
              width="40"
              height="50"
              className="d-inline-block align-center"
              alt="React Bootstrap logo"
            />{' '}
            Student Management System
        </Navbar.Brand>
    </Navbar>
    </div>
  );
};

export default Navigation;
Now if you refresh the browser, you will still see the old page. The Navigation bar is not being rendered. It is because we have not added this component in our main App component. To render each component we need to add this inside our App.js file.
4. Add these lines below import React from react; in src/App.js file:
import React from 'react';
import 'bootstrap/dist/css/bootstrap.min.css';
import Navigation from "./components/Navigation";
Here we are importing bootstrap styling and Navigation component from components folder that we just created inside App.js.
5. Add below code in src/App.js to render Navigation component:
function App() {
return (
<Navigation />
);
}
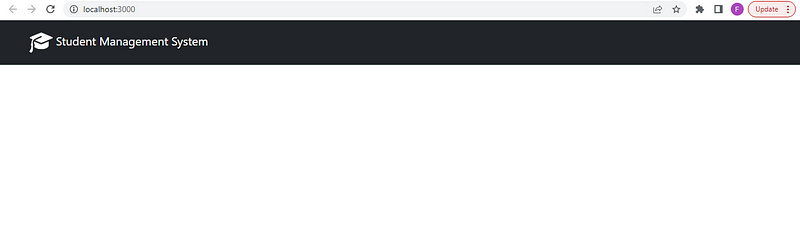
export default App;Your screen should look like this:
Create Side Navigation Bar
cdbreact library. Install this library using below command:npm install cdbreact2. Import NavLink and cdbreact components inside src/components/Navigation.js. We will use NavLink to navigate to different pages e.g Home, Students List or Manage students and use cdbreact to create Sidebar.
import {NavLink} from 'react-router-dom';
import {
  CDBSidebar,
  CDBSidebarContent,
  CDBSidebarFooter,
  CDBSidebarHeader,
  CDBSidebarMenu,
  CDBSidebarMenuItem,
} from 'cdbreact';
3. Add code for sidebar in Navigation.js file below line </Navbar>
<div className='sidebar'>
<CDBSidebar textColor="#333" backgroundColor="#f0f0f0">
    <CDBSidebarHeader prefix={<i className="fa fa-bars" />}>
      Navigation
    </CDBSidebarHeader>
    <CDBSidebarContent>
      <CDBSidebarMenu>
        <NavLink exact to="/" activeClassName="activeClicked">
          <CDBSidebarMenuItem icon="home">Home</CDBSidebarMenuItem>
        </NavLink>
        <NavLink exact to="/student" activeClassName="activeClicked">
          <CDBSidebarMenuItem icon="list">Students List</CDBSidebarMenuItem>
        </NavLink>
        <NavLink exact to="/manage" activeClassName="activeClicked">
          <CDBSidebarMenuItem icon="user">Manage Students</CDBSidebarMenuItem>
        </NavLink>
      </CDBSidebarMenu>
    </CDBSidebarContent>
  </CDBSidebar>
</div>
Your final Navigation.js file should look like this:
import React from 'react';
import {
  CDBSidebar,
  CDBSidebarContent,
  CDBSidebarHeader,
  CDBSidebarMenu,
  CDBSidebarMenuItem,
} from 'cdbreact';
import {NavLink} from 'react-router-dom';
import {Navbar} from 'react-bootstrap';
import logo from '../static/logo.png';
import "../App.css";


const Navigation = () => {
  return (
    <div>
    <Navbar bg="dark" variant="dark" expand="lg" id="my-nav">
        <Navbar.Brand className="app-logo" href="/">
            <img
              src={logo}
              width="40"
              height="50"
              className="d-inline-block align-center"
              alt="React Bootstrap logo"
            />{' '}
            Student Management System
        </Navbar.Brand>
    </Navbar>
    <div className='sidebar'>
    <CDBSidebar textColor="#333" backgroundColor="#f0f0f0">
        <CDBSidebarHeader prefix={<i className="fa fa-bars" />}>
          Navigation
        </CDBSidebarHeader>
        <CDBSidebarContent>
          <CDBSidebarMenu>
            <NavLink exact to="/" activeClassName="activeClicked">
              <CDBSidebarMenuItem icon="home">Home</CDBSidebarMenuItem>
            </NavLink>
            <NavLink exact to="/students" activeClassName="activeClicked">
              <CDBSidebarMenuItem icon="list">Students List</CDBSidebarMenuItem>
            </NavLink>
            <NavLink exact to="/manage" activeClassName="activeClicked">
              <CDBSidebarMenuItem icon="user">Manage Students</CDBSidebarMenuItem>
            </NavLink>
          </CDBSidebarMenu>
        </CDBSidebarContent>
      </CDBSidebar>
    </div>
    </div>
  );
};

export default Navigation;
4. For side Navbar we are using className='sidebar'.We need to define this class inside our src/App.css file:
.sidebar {
   display: flex;
   height: 100vh;
   float: left;
   overflow: 'scroll initial';
}
5. For NavLink to work, we will need to import BroswseRouter component in our src/App.js file:
import {BrowserRouter} from 'react-router-dom';6. Update function App()code with below code in App.js:
function App() {
return (
<BrowserRouter>
<Navigation />
</BrowserRouter>
);
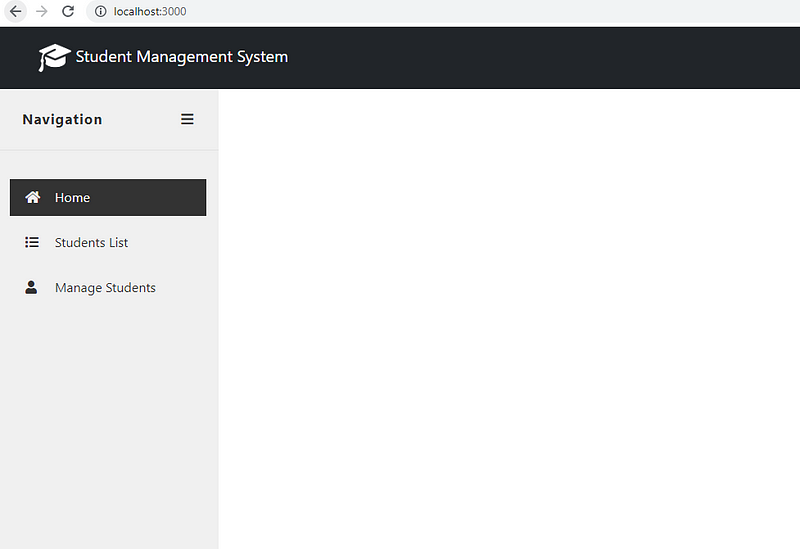
}7. Now if you will refresh the page, it should look like this:
Create Home Page
Our home page is a simple image slider. For image slider we will use react-bootstrap Carouselcomponent.
1. Add a file named Home.js inside /src/components folder with this code:
import slide01 from '../static/slide01.jpg'
import slide02 from '../static/slide02.jpg'
import slide03 from '../static/slide03.jpg'

import Carousel from 'react-bootstrap/Carousel';

const Home = () => {
  return (
  <div className="row">
    <Carousel variant="dark">
      <Carousel.Item>
        <img
          className="d-block w-100"
          src={slide01}
          alt="First slide"
        />
      </Carousel.Item>
      <Carousel.Item>
        <img
          className="d-block w-100"
          src={slide03}
          alt="Second slide"
        />
      </Carousel.Item>
      <Carousel.Item>
        <img
          className="d-block w-100"
          src={slide02}
          alt="Third slide"
        />
      </Carousel.Item>
    </Carousel>
    </div>
  );
};

export default Home;
2. Add files slide01.jpg, slide02.jpg and slide03.jpg inside/src/static folder.
3. We need to add Home component inside App.js file for this to render. But before that we need to install react-router library as we will be using React Router to route to different pages.
npm install react-router
npm install react-router-dom
4. Add Home component as a Route inside App.js file:
import Home from "./components/Home";
import {BrowserRouter, Route, Routes} from 'react-router-dom';
function App() {
  return (
    <BrowserRouter>
      <Navigation />
      <Routes>
         <Route exact path="/" element={<Home/>} />
       </Routes>
    </BrowserRouter>
  );
}
5. Now if you will do npm start and refresh the page, it should look like this:

If you navigate to Students List or Manage Students page, you should see empty pages. Lets start developing these pages.
Create Students List Page
We will get the students list from our backend API that we developed in first part of this tutorial. To call the API from react, we will create a StudentService.
1. Create a folder named servicesinside /srcfolder and a add a file named StudentService.jsinside /src/servicesfolder with this code:
import axios from 'axios';

export function getStudents() {
  return axios.get('http://127.0.0.1:8000/students/')
    .then(response => response.data)
}
Here we are creating a function getStudents()which is calling our backend API endpoint /students to fetch list of students from backend. We are using axios library for this. Install this library using below command:
npm install axios2. Add styling for this component inside App.css file:
.side-container {
   padding-top: 30px;
}

.side-row {
   padding: 30px;
}

.react-bootstrap-table thead {
    position: sticky;
    top: 0;
    background-color: #333;
    z-index: 1021;
    color: white;
}
3. Add a file named Students.js inside /src/components folder with below code:
import React, { useEffect, useState } from 'react';
import { Table } from 'react-bootstrap';
import { getStudents } from '../services/StudentService';
import "../App.css";

const Students = () => {
  const [students, setStudents] = useState([]);

  useEffect(() => {
   let mounted = true;
   getStudents()
     .then(data => {
       if(mounted) {
         setStudents(data)
       }
     })
   return () => mounted = false;
 }, [])

  return(
   <div className="container-fluid side-container">
   <div className="row side-row" >
    <p id="before-table"></p>
        <Table striped bordered hover className="react-bootstrap-table" id="dataTable">
        <thead>
            <tr>
            <th>ID</th>
            <th>First Name</th>
            <th>Last Name</th>
            <th>Registration No</th>
            <th>Email</th>
            <th>Course</th>
            </tr>
        </thead>
        <tbody>
            {students.map((stu) =>
            <tr key={stu.id}>
                <td>{stu.studentId}</td>
                <td>{stu.FirstName}</td>
                <td>{stu.LastName}</td>
                <td>{stu.RegistrationNo}</td>
                <td>{stu.Email}</td>
                <td>{stu.Course}</td>
            </tr>)}
        </tbody>
    </Table>
    </div>
  </div>
  );
};

export default Students;
In first line of function Students(), we are using a react state students and initializing this state to empty array using react hook useState:
const [students, setStudents] = useState([]);useEffect hook is calling getStudents service that we defined inside StudentService.js file. This will be called every time page is refreshed or loaded.
4. Finally, we will add a route for Students component inside App.js:
import Students from "./components/Students";
function App() {
  return (
    <BrowserRouter>
      <Navigation />
      <Routes>
         <Route exact path="/" element={<Home/>} />
         <Route path="/students" element={<Students/>} />
       </Routes>
    </BrowserRouter>
  );
}
5. Now if you refresh the page and navigate to Students List page, you should get the data from backend. And it should render on frontend. If any new object is added or deleted from backend and page is refreshed on frontend, then you will see the changes on frontend.
6. If you do not see any data, then make sure that backend service is up. To start the backend navigate to backend directory and start django server:
cd backend
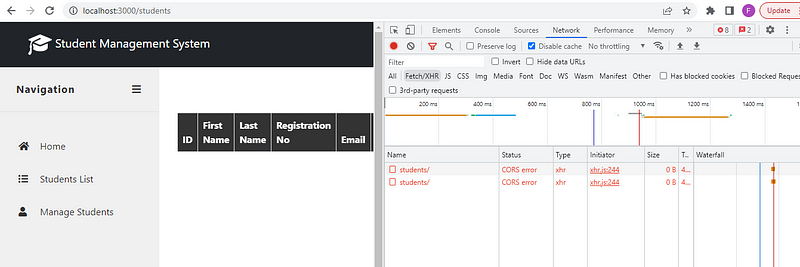
python manage.py runserverIf you still do not get the data, then inspect the API call. Right click on students list page and click inspect. In opened window go inside Netwroktab and refresh students list page. If you get CORS errorin status field then you need to fix this from backend. This error usually happens if Cross-Origin Resource Sharing is not allowed by backend server. In that case AllowOrigin header is usually missing in the response. To allow javascript to read response data from API, Cross-Origin Resource Sharing must be allowed by backend server.
In backend/settings.py file make sure these settings are set:
i) Check if ’corsheaders' is added in INSTALLED_APPS:
INSTALLED_APPS = [
    'django.contrib.admin',
    'django.contrib.auth',
    'django.contrib.contenttypes',
    'django.contrib.sessions',
    'django.contrib.messages',
    'django.contrib.staticfiles',
    'backend',
    'corsheaders',
    'rest_framework',
]
ii) Check if CORS_ORIGIN_ALLOW_ALL = True is set:
CORS_ORIGIN_ALLOW_ALL = Trueiii) Check if 'corsheaders.middleware.CorsMiddleware'is added in MIDDLEWARE:
CORS_ORIGIN_ALLOW_ALL = True
MIDDLEWARE = [
'corsheaders.middleware.CorsMiddleware',
'django.middleware.security.SecurityMiddleware',
'django.contrib.sessions.middleware.SessionMiddleware',
'django.middleware.common.CommonMiddleware',
'django.middleware.csrf.CsrfViewMiddleware',
'django.contrib.auth.middleware.AuthenticationMiddleware',
'django.contrib.messages.middleware.MessageMiddleware',
'django.middleware.clickjacking.XFrameOptionsMiddleware',
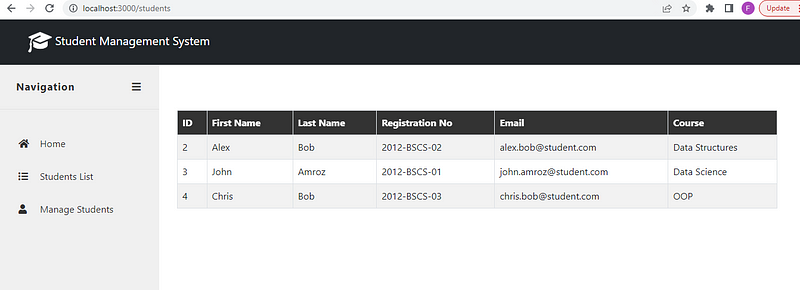
]7. Now if you will refresh the students list page you should see that data is rendered:
Create Manage Students Page
We need to write the functionality for add student, update student and delete student. We will create separate components for these. We will also need to install react-icons library as we will be using delete and update icons from this library.
npm install react-cionsCreate Manage.js
Manage.js in /src/components folderManage.js file:import React,{ useEffect, useState } from 'react';
import {Table} from 'react-bootstrap';
import {Button,ButtonToolbar } from 'react-bootstrap';
import { FaEdit } from 'react-icons/fa';
import { RiDeleteBin5Line } from 'react-icons/ri';
import { getStudents, deleteStudent } from '../services/StudentService';
import AddStudentModal from "./AddStudentModal";
import UpdateStudentModal from "./UpdateStudentModal";We are using useState hook for managing states e.g. for updating students list when a new student is added or deleted. useEffect state will be used for managing events e.g. updating page contents when a student is added or deleted.
We will add components for AddStudentModal and updateStudentModal later.
3. Add these states in Manage.js file:
const Manage = () => {
    const [students, setStudents] = useState([]);
    const [addModalShow, setAddModalShow] = useState(false);
    const [editModalShow, setEditModalShow] = useState(false);
    const [editStudent, setEditStudent] = useState([]);
    const [isUpdated, setIsUpdated] = useState(false);
};

export default Manage;
4. Add useEffect hook in Manage.js:
useEffect(() => {
   let mounted = true;
   if(students.length && !isUpdated) {
    return;
    }
   getStudents()
     .then(data => {
       if(mounted) {
         setStudents(data);
       }
     })
   return () => {
      mounted = false;
      setIsUpdated(false);
   }
 }, [isUpdated, students])
In this hook we are checking if the students list is updated on backend due to any CRUD operation then we will update the students state and re-render the updated list. We will also update the state and re-render whenever page is refreshed or loaded. We are handling this using mounted flag.
5. Next we will add handlers for handling update, add and delete events:
const handleUpdate = (e, stu) => {
    e.preventDefault();
    setEditModalShow(true);
    setEditStudent(stu);
};
Here, whenever use will click update button, we will call handleUpdate handler on button click event. This handler will set some states i.e. it will enable edit student form for editing student.
Similarly we can add Add and Delete handlers:
const handleAdd = (e) => {
    e.preventDefault();
    setAddModalShow(true);
};

const handleDelete = (e, studentId) => {
    if(window.confirm('Are you sure ?')){
        e.preventDefault();
        deleteStudent(studentId)
        .then((result)=>{
            alert(result);
            setIsUpdated(true);
        },
        (error)=>{
            alert("Failed to Delete Student");
        })
    }
};
In handleDelete we are calling deleteStudent service which we will define in /src/services/StudentService.js file:
export function deleteStudent(studentId) {
  return axios.delete('http://127.0.0.1:8000/students/' + studentId + '/', {
   method: 'DELETE',
   headers: {
     'Accept':'application/json',
     'Content-Type':'application/json'
   }
  })
  .then(response => response.data)
}
6. Finally we will add bootstrap for rendering content on Manage students page:
let AddModelClose=()=>setAddModalShow(false);
let EditModelClose=()=>setEditModalShow(false);
return(
<div className="container-fluid side-container">
<div className="row side-row" >
<p id="manage"></p>
<Table striped bordered hover className="react-bootstrap-table" id="dataTable">
<thead>
<tr>
<th >ID</th>
<th>First Name</th>
<th>Last Name</th>
<th>Registration No</th>
<th>Email</th>
<th>Course</th>
<th>Action</th>
</tr>
</thead>
<tbody>
{ students.map((stu) =>
<tr key={stu.id}>
<td>{stu.studentId}</td>
<td>{stu.FirstName}</td>
<td>{stu.LastName}</td>
<td>{stu.RegistrationNo}</td>
<td>{stu.Email}</td>
<td>{stu.Course}</td>
<td>
<Button className="mr-2" variant="danger"
onClick={event => handleDelete(event,stu.studentId)}>
<RiDeleteBin5Line />
</Button>
<span> </span>
<Button className="mr-2"
onClick={event => handleUpdate(event,stu)}>
<FaEdit />
</Button>
<UpdateStudentModal show={editModalShow} student={editStudent} setUpdated={setIsUpdated}
onHide={EditModelClose}></UpdateStudentModal>
</td>
</tr>)}
</tbody>
</Table>
<ButtonToolbar>
<Button variant="primary" onClick={handleAdd}>
Add Student
</Button>
<AddStudentModal show={addModalShow} setUpdated={setIsUpdated}
onHide={AddModelClose}></AddStudentModal>
</ButtonToolbar>
</div>
</div>
);In this code you can see that we are calling handlers on button click events e.g. handleUpdate and the logic to update/add students is being handled in UpdateStudentModal and AddStudentModal components which we will implement next.
AddStudentModal.js
AddStudentModal.js in /src/components with below code:import React from 'react';
import {Modal, Col, Row, Form, Button} from 'react-bootstrap';
import {FormControl, FormGroup, FormLabel} from 'react-bootstrap';
import { addStudent } from '../services/StudentService';
const AddStudentModal = (props) => {
const handleSubmit = (e) => {
e.preventDefault();
addStudent(e.target)
.then((result)=>{
alert(result);
props.setUpdated(true);
},
(error)=>{
alert("Failed to Add Student");
})
}
return(
<div className="container">
<Modal
{...props}
size="lg"
aria-labelledby="contained-modal-title-vcenter"
centered >
<Modal.Header closeButton>
<Modal.Title id="contained-modal-title-vcenter">
Fill In Student Information
</Modal.Title>
</Modal.Header>
<Modal.Body>
<Row>
<Col sm={6}>
<Form onSubmit={handleSubmit}>
<Form.Group controlId="FirstName">
<Form.Label>First Name</Form.Label>
<Form.Control type="text" name="FirstName" required placeholder="" />
</Form.Group>
<Form.Group controlId="LastName">
<Form.Label>Last Name</Form.Label>
<Form.Control type="text" name="LastName" required placeholder="" />
</Form.Group>
<Form.Group controlId="RegistrationNo">
<Form.Label>Registration No.</Form.Label>
<Form.Control type="text" name="RegistrationNo" required placeholder="" />
</Form.Group>
<Form.Group controlId="Email">
<Form.Label>Email</Form.Label>
<Form.Control type="text" name="Email" required placeholder="" />
</Form.Group>
<Form.Group controlId="Course">
<Form.Label>Course</Form.Label>
<Form.Control type="text" name="Course" required placeholder="" />
</Form.Group>
<Form.Group>
<p></p>
<Button variant="primary" type="submit">
Submit
</Button>
</Form.Group>
</Form>
</Col>
</Row>
</Modal.Body>
<Modal.Footer>
<Button variant="danger" type="submit" onClick={props.onHide}>
Close
</Button>
</Modal.Footer>
</Modal>
</div>
);
};
export default AddStudentModal;Here we are using props for passing students information from Manage.js into AddStudentModal component. Props are used for passing states information from one component to other.
handleSubmit handler will be called once user clicks submit button. This handler will call addStudent service which will call backend endpoint to add student in database.
2. Add addStudent service in /src/services/StudentService.js :
export function addStudent(student){
  return axios.post('http://127.0.0.1:8000/students/', {
    studentId:null,
    FirstName:student.FirstName.value,
    LastName:student.LastName.value,
    RegistrationNo:student.RegistrationNo.value,
    Email:student.Email.value,
    Course:student.Course.value
  })
    .then(response=>response.data)
}
UpdateStudentModal.js
UpdateStudentModal.js in /src/components with below code:import React,{Component} from 'react';
import {Modal, Col, Row, Form, Button} from 'react-bootstrap';
import {FormControl, FormGroup, FormLabel} from 'react-bootstrap';
import { updateStudent } from '../services/StudentService';
const UpdateStudentModal = (props) => {
const handleSubmit = (e) => {
e.preventDefault();
updateStudent(props.student.studentId, e.target)
.then((result)=>{
alert(result);
props.setUpdated(true);
},
(error)=>{
alert("Failed to Update Student");
})
};
return(
<div className="container">
<Modal
{...props}
size="lg"
aria-labelledby="contained-modal-title-vcenter"
centered >
<Modal.Header closeButton>
<Modal.Title id="contained-modal-title-vcenter">
Update Student Information
</Modal.Title>
</Modal.Header>
<Modal.Body>
<Row>
<Col sm={6}>
<Form onSubmit={handleSubmit}>
<Form.Group controlId="FirstName">
<Form.Label>First Name</Form.Label>
<Form.Control type="text" name="FirstName" required defaultValue={props.student.FirstName} placeholder="" />
</Form.Group>
<Form.Group controlId="LastName">
<Form.Label>Last Name</Form.Label>
<Form.Control type="text" name="LastName" required defaultValue={props.student.LastName} placeholder="" />
</Form.Group>
<Form.Group controlId="RegistrationNo">
<Form.Label>Registration No.</Form.Label>
<Form.Control type="text" name="RegistrationNo" required defaultValue={props.student.RegistrationNo} placeholder="" />
</Form.Group>
<Form.Group controlId="Email">
<Form.Label>Email</Form.Label>
<Form.Control type="text" name="Email" required defaultValue={props.student.Email} placeholder="" />
</Form.Group>
<Form.Group controlId="Course">
<Form.Label>Course</Form.Label>
<Form.Control type="text" name="Course" required defaultValue={props.student.Course} placeholder="" />
</Form.Group>
<Form.Group>
<p></p>
<Button variant="primary" type="submit">
Submit
</Button>
</Form.Group>
</Form>
</Col>
</Row>
</Modal.Body>
<Modal.Footer>
<Button variant="danger" type="submit" onClick={props.onHide}>
Close
</Button>
</Modal.Footer>
</Modal>
</div>
);
};
export default UpdateStudentModal;2. Add updateStudent service in /src/services/StudentService.js :
export function updateStudent(stuid, student) {
  return axios.put('http://127.0.0.1:8000/students/' + stuid + '/', {
    FirstName:student.FirstName.value,
    LastName:student.LastName.value,
    RegistrationNo:student.RegistrationNo.value,
    Email:student.Email.value,
    Course:student.Course.value
  })
   .then(response => response.data)
}
Add Manage component in React Router
Manage component we will need to add this as a Route in /src/App.js:import Manage from "./components/Manage";
function App() {
return (
<BrowserRouter>
<Navigation />
<Routes>
<Route exact path="/" element={<Home/>} />
<Route path="/students" element={<Students/>} />
<Route path="/manage" element={<Manage/>} />
</Routes>
</BrowserRouter>
);
};Test CRUD Operations
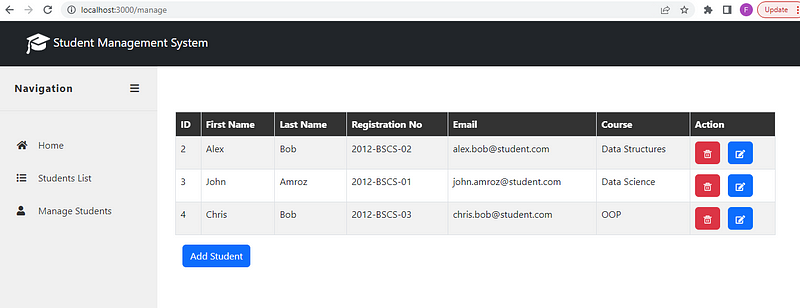
- Navigate to Manage Students page, it should look like this:
2. To add a new student, click on Add Student button. This will open add student form.
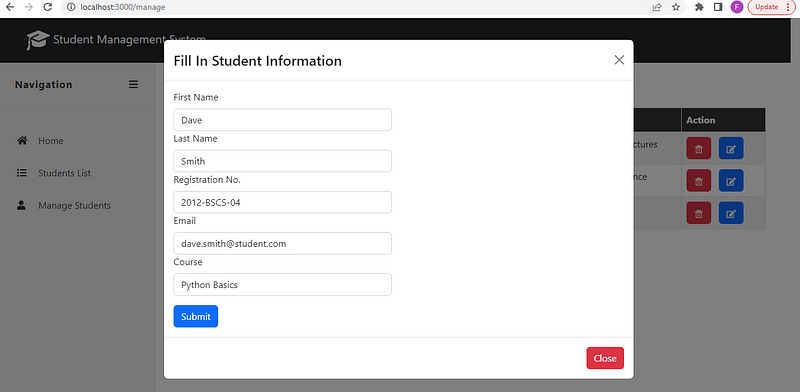
3. Fill in the student information and click submit. This will open a popup alert if student is added successfully:
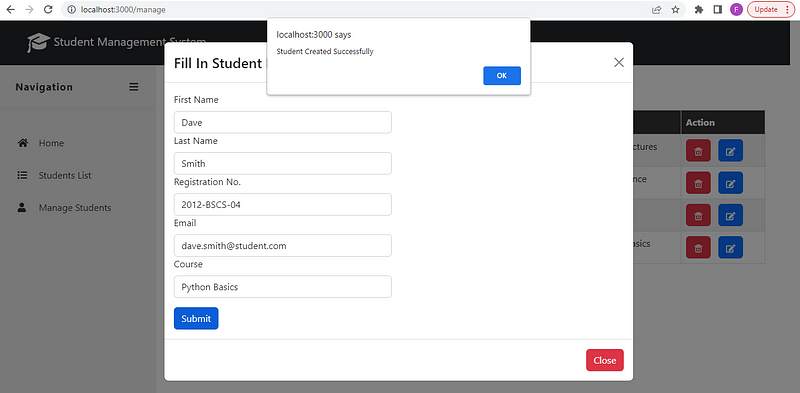
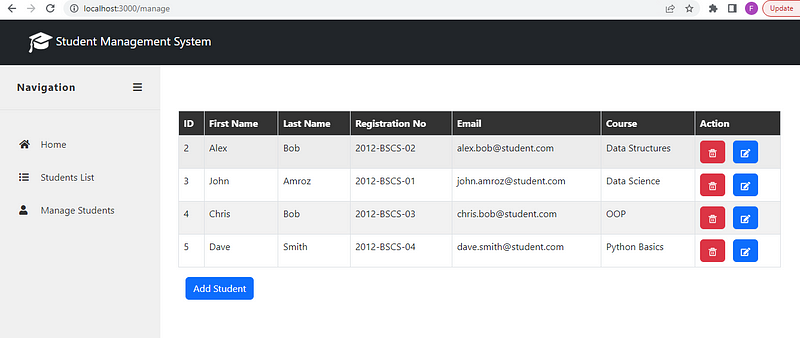
Now if you close the add student Form. You will see that students list is updated without refreshing the page. This is because we are updating students list in useEffect hook whenever a new student is added, deleted or updated.
4. Similarly, you can test update and delete operations.
Summary:
Congratulations, you have completed this tutorial series on developing a CRUD application using Django and React Js.
In this series you learned:
- What is REST API, CRUD and HTTP Verbs
- Backend development of a CRUD application using Django Rest Framework
- React core concepts e.g. JSX, DOM, components, states, hooks, props
- Frontend development of a CRUD application using React Js
- Integrating frontend with backend using react axios library
You are now in a position to develop any full stack web application using Django and React. In some later articles we will also learn how you can add unit tests to your Django application and integrate swagger for API documentation.


Comments
Post a Comment